Frozen Fever

I may have been away from this blog for a little while but I have still been baking on and off.

A few months ago, my daughter celebrated her birthday. For a good three or four months before her birthday, she was obsessed with the Disney film Moana. And we only picked up that film as part of a 2 for £12 offer on Disney DVDs in our local HMV. We had visited looking for Monster’s Inc. and had emerged from the store with characters Mike and Sully and Moana and Maui in our midst.

Image result for moana

As with most kids, I thought that the Moana phase was simply just that: a phase. However, Christmas rolled around and Moana was still a firm favourite with my daughter to the point where she was singing songs from the film and pretending to be Moana (if you’re interested, I was cast as the role of Moana’s grandma; Moana’s mother; and even Hei Hei the chicken!). We entered the new year and Moana was still going strong and that’s when I set up a board on Pinterest for potential ideas for a Moana themed birthday cake.

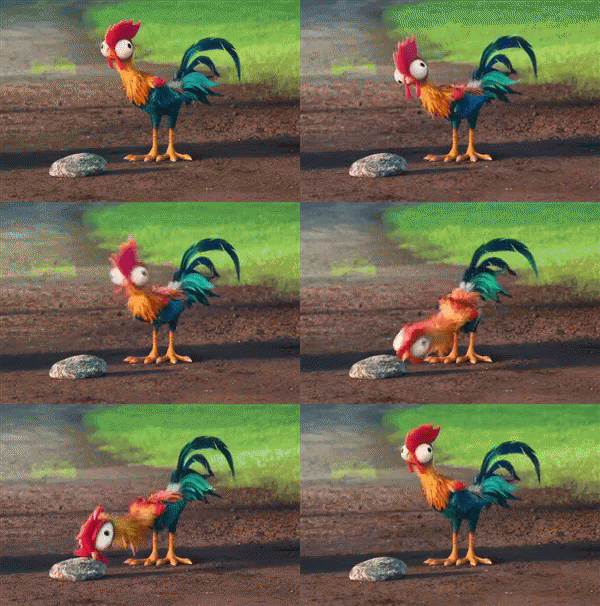
Image result for moana hei hei gif


I was SO excited to make this cake for her and knew that she would be uncontrollably excited for it. The sand of the beach was going to be made from crushed up biscuit; the sea was going to be ombre blue and turquoise colours piped like waves on the side of the cake; and I was even going to attempt a green swirl in the sponge for the Heart of Te Fiti. Her mind was going to be BLOWN.

And then came along two sisters in the form of Princesses Anna and Elsa.

See the source image

And Moana was given the cold shoulder and had taken a back seat and it was literally back to the drawing board for me and ideas for the cake.

The Frozen phase was (and still is) going strong so I gave in and decided to make a Frozen cake for her birthday.

Now, if you have been a follower for sometime or have had a browse through previous posts, you would have stumbled across the Frozen cupcakes I baked for my niece many moons ago. Atop of the cupcakes were faces made from fondant of the loveable snowman, Olaf. I would have loved to have made the fondant figures to go on top of the cake and I think it would have been absolutely doable however, long gone are the days where I can sit at a table for hours just listening to music and playing with icing. I have two small children to look after now and time is precious and valuable and so, where possible, I have to perhaps cut corners or do things that are convenient to me. So I have no shame in announcing that when I decided to make a Frozen themed birthday cake for my daughter, that I bought a Frozen figure playset from the Disney Store and used them as cake toppers. Plus, they doubled up as an extra birthday present, huzzah!

Again, a board was set up on Pinterest and I set to researching ideas for the cake. In the end, I had decided to make a snow scene for the cake decoration. I borrowed some snowflake cutters from my Mom’s baking arsenal (and wondered why I don’t have any of my own?!) and cut out a variety of snowflakes in different shapes and sizes.

I first covered the cake in a light blue fondant and then draped white fondant over this, with a snow fall effect on the edges. To do this, I cut out a rough circle of white fondant and then went round the edges in waves with a pizza wheel (who knew a pizza wheel could be used for something other than pizza?). Once the cake had been covered in fondant, I then placed the snowflakes on top et voila, the cake was decorated. Once I was happy with the positioning of the snowflakes, I ‘glued’ them down using a little brush of water on the back of each snowflake. Once everything had settled on top of the cake, I then placed the figures on top.

Frozen Fever

Frozen Fever

It was a really easy cake to decorate and, as it was my first cake that I have decorated in a very long while, I don’t think it turned out too bad. It’s perhaps not my best but it certainly isn’t my worst!

My daughter loved it and had fun picking off the little snowballs from around the cake. If I’m honest, she was probably about 65% sugar for the week after her birthday as she tends to eat the icing or fondant or ganache off of a cake and then leaves the actual sponge. And enter Mommy to finish off the cake because, you know, we can’t waste food, especially cake! ;p

Happy baking!

Ps If you’re wondering, the answer is yes. I do have the Maui rap nailed!

See the source image

Another Who Challenge

Ok, so I guess I shot myself in the foot two years ago when I made a Tardis cake for my niece.

Yes, she loved it.

Yes, it was Doctor Who themed and yes it was perfect for her being a big Doctor Who fan.

So what’s my problem?

SHE HAS A BIRTHDAY EVERY YEAR!

Last year, I made her those DW themed chocolate cupcakes and when I was asked this year to make her another DW themed cake, I was kinda stumped.

I do not yet have a Dalek cake pan in my baking arsenal nor do I have a Cyberman shaped tin. I do have a series of Who themed cookie cutters, but this was no cookie occasion. Oh no. This had to be cake and it had to be an epic one at that.

Admittedly, I turned to my ol’ friend Google and searched for inspiration. The many hits returned a myriad of Tardi (plural for Tardis??), Daleks and space scapes, with cleverly designed cupcakes to boot. And then, in the midst of the photographs and fan drawings, I stumbled across a bow tie cake.

*light bulb*

I’m almost certain that her favourite doctor is Matt Smith’s eleventh doctor (personally, I think David Tennant’s tenth doctor is the best but that’s another discussion for later!) and seeing as though I have already made a fez cake for another family birthday, I thought it would be a challenge to make a bow tie out of cake and fondant.

And that’s just what I did.

I took inspiration from shirt and tie cakes floating around and fashioned the cake on similar attire Smith wears for his regeneration of The Doctor.

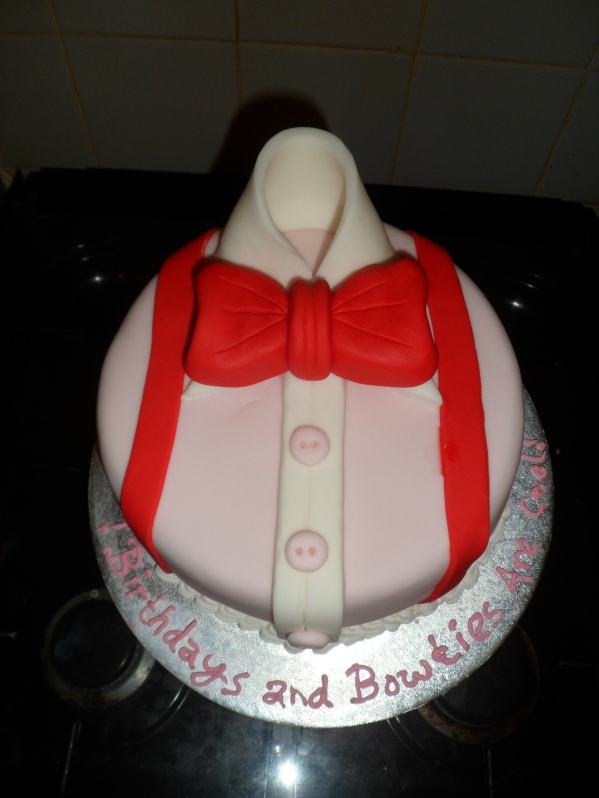
I dyed a large piece of fondant light pink to use for a shirt; and a smaller piece red to use for the bow tie and braces.

I adapted a red velvet recipe and baked two blue velvet cakes (blue for the Tardis. See what I did there? Blue for a blue box? Huh? Huh?!). The smell of chocolate in my kitchen was AMAZING and the colour of the sponge after I had levelled the cake off was a fantastic bright blue. I didn’t want to use a cream cheese frosting to sandwich the two cakes together and opted for marshmallow fluff and chocolate fudge icing instead. This seemed like a good idea, but in my warm kitchen, as I prepared dinner, the cake had other ideas; the filling started to melt! I tidied the edges up and moved the cake to a cooler room until I needed it. Crisis adverted. Phew.

*wipes brow*

A few hours had passed and my kitchen became cool enough to work in. I took out my shiny new turntable (thanks to my lovely friend for the birthday gift!) and set to work.
First, I rolled out the pink fondant and covered the cake with it. I then took some white fondant and fashioned a shirt collar and placed it atop of the cake. Next, I rolled out two thin strips of red fondant and cut them to size for the braces and finally, I made the bow tie.

I had originally made white chocolate buttons (with a snazzy chocolate button mould I had picked up from a cook shop) but when I handled them in my now cool kitchen, they began to melt. So I decided to not take a risk with chocolate and made some buttons from fondant. I assembled the shirt and bow tie on the cake before adding finishing touches with royal icing.

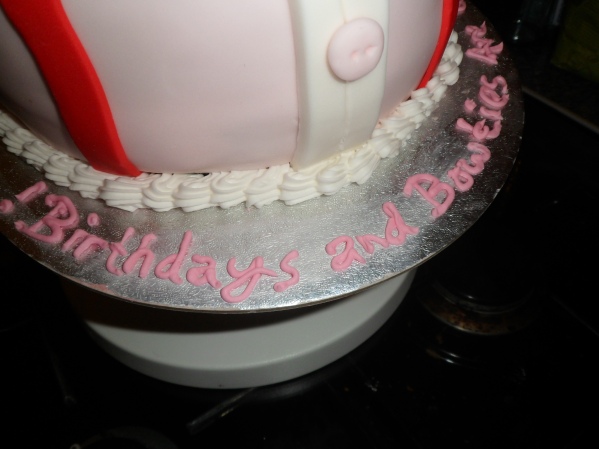
Birthdays and Bowties are Cool

Birthdays and Bowties are Cool

The birthday girl had no idea that she was going to get yet another Doctor Who cake and I think it’s safe to say that she was utterly surprised and enjoyed it very much

🙂

Bow Ties are Cool

Bow Ties are Cool

A Disney Themed Birthday

I have a friend who is very dear to me and whom I have known for a very long time. She absolutely adores Disney and it was only natural that she had Disney Princess themed cupcakes for her birthday, back in September.

This has been one of my favourite projects so far.

Why?

Lean in close, I want to confess something to you:

I LOVE DISNEY TOO!

I had been given a Disney compilation album as a gift last Christmas from The Hubs and played it full blast as I played with fondant to create items related to each Disney Princess.

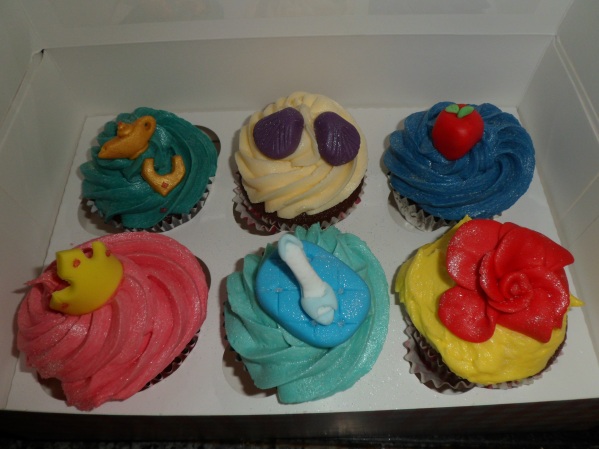
I used my usual go to recipe for chocolate cupcakes. While the cakes cooled, I whipped up a batch of vanilla buttercream and then separated it between six bowls. I coloured each bowl of icing to correspond with the colour of the dress each Disney Princess wears: Turquoise for Jasmine; royal blue for Snow White; pink for Aurora; light blue for Cinderella; and yellow for Belle. Now, before you start shouting “What about Ariel? She’s a mermaid, with a turquoise tail and fins! Why is she cream?!” I shall tell you. I didn’t want her to clash with Jasmine, so left her cake a plain colour.
I then piped a swirl on top of each cake and then decorated with the toppers I had made.

Needless to say, the birthday girl enjoyed them 🙂

Disney Princess Cupcakes

Disney Princess Cupcakes

Baking Projects: April – July Part #2

Ice Cream Sundae

Ice Cream Sundae

Hello and welcome to the second part of my post, Baking Projects: April – July! As mentioned in previous posts, birthdays of my close family and friends are not evenly spread throughout the year, but seem to come along in groups. This is when I ditch reality and escape into a fantasy world where I bake full time and I become best friends with my mixer and my epic bag of sugar (which, has nearly ran out. Time to restock methinks!).

In my last post, I wrote of how The Hubs and my father-in-law celebrate their birthdays in June. Well, the birthday celebrations don’t end there, as my little brother (now taller than I am) celebrates his birthday in June, too.

Episode 2: Attack of the Pigs

In the past, I have baked my brother a variety of novelty cakes: Wii remote; fez; and a playing card themed cake. This year, I decided to do something a little different and bake him some cup cakes.

For the cake, I used my go to chocolate sponge recipe. This is the best chocolate cupcake recipe I have ever used.

Fact.

I had found the recipe online at BBC Good Food.

To ensure the sponge stays moist and doesn’t dry out, I always fill a baking pan with water and place it at the bottom of the oven whilst the cakes are baking.

Once the cakes were cooked and left to cool, I piped a swirl of chocolate icing on top before decorating. This was the fun part.

My brother is definitely a gadget fan and is forever downloading the latest apps or games to his phone. A particular favourite of his is Angry Birds. So of course, it seemed only natural for me to create the familiar feathered characters in icing.

Angry Birds

Angry Birds

My favourite part of this project was creating the teeth for the pigs! Needless to say, my brother enjoyed his birthday surprise! He still has the cake toppers at home as he can’t bring himself to eat them. If that’s not a testament to my creation, then I don’t know what is!

It’s so Fluffy!

Three weeks or so after this baking escapade, my good friend celebrated her birthday in July. I racked my brains to think of a bake that would top or even match those Cookie Monster cupcakes I baked for her last year.

And then inspiration struck on a trip to the cinema.

I had watched Despicable Me with The Hubs earlier this year (behind with the times, I know!) and instantly fell in love with the minions. When I first saw an advert for the sequel, I knew I had to go watch it! So, I had arranged a time with my friend and I went to see Despicable Me 2 with her and it was brilliant! As I watched the film, I looked at the minions and the other characters and thought, ‘they would be easy to replicate in icing’.

And ta-daa! A cake was born!

I decided to use a red velvet recipe for the cakes before covering them in fondant icing. Covering the cupcakes in fondant is something I’m not used to and my technique of covering and smoothing the cakes will only improve with practice. That’s what I keep telling myself.

It is at this point that I’d like to make a kitchen confession: when baking cupcakes for birthdays, I always bake too many cupcakes than are needed so I can experiment with designs and ideas ^_^

Covering the cakes with fondant didn’t take too long to do; it was giving the cakes character that took time. I still have on loan, from my mum, a bottle of silver edible paint and I used this to paint the rims of the goggles of the minions. For the purple minions, I had planned to use candyfloss for their crazy purple hair. Unfortunately, with the heat and humidity the UK has experienced recently, the ‘hair’ dissolved over night and I had to use rolled up fondant for the hair. This seemed to work but I would have preferred to use the candyfloss. Oh well. Never mind.

Despicable Me

Despicable Me

Somewhere Over the Rainbow…

As a birthday treat, my niece had her birthday party at our local Lush store.

She loves Lush.

She really loves Lush.

And that is why I made her Lush inspired birthday cakes. I took inspiration from different bath bombs and bubble bars the handmade cosmetic company sells and made miniature versions out of fondant (I have kept Dr. Oetker in business with the amount of fondant I have bought over these last few months!).

This was a fun Saturday morning project to wake up to (I bake all the cakes on the day of giving to the lucky birthday boys and girls, so that the cakes are as fresh as possible and last just that little bit longer ^_^ ). I started baking at 06:00 and by 10:00, the cakes were baked, cooled and decorated, ready to give to the birthday girl ^_^

A Lush Birthday

A Lush Birthday

Baking Projects: April – July Part #1

It’s been a while since my last post and I thought it was about high time that I shared some recent (and not so recent) creations with you.

March and April are months filled with many a birthday, which gives me many a baking and creating opportunity.

The last birthday to celebrate in April was that of my brother-in-law. He loves reading and is an avid fan of The Godfather.

“What did you bake for him?” I hear you cry!
Well, my dearest reader of this blog, I will tell you, nay, I will show you:

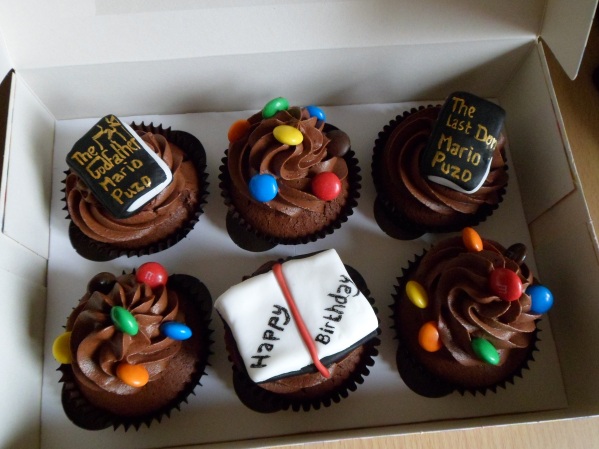
Cupcakes Inspired by The Godfather

Cupcakes Inspired by The Godfather

Cupcakes Inspired by The Godfather

Cupcakes Inspired by The Godfather

My lovely bro-in-law was presented with some scrumptious chocolate cupcakes, with swirled chocolate frosting and bookish themed cake toppers. I can’t quite remember how long it took to make the toppers, but I do know that I watched some sort of chick flick to keep me entertained (the title of which escapes me, but if I had to guess, it was probably Bridget Jones’ Diary or My Big Fat Greek Wedding). Initially, I was quite happy to leave the books made from fondant, plain. I then remembered that I had some gold paint and wouldn’t rest until I had *attempted* to re-create the book jackets of Mario Puzo’s novels in sugar form. This was lots of fun to do and required an awful lot of concentration and the obligatory tongue-stuck-out-to-help-me-concentrate -look. It works, honest.
I wasn’t home when he collected them but The Hubs said that he really liked them. I just hope he enjoyed munching them ^_^

May passed by without a birthday to be seen and then we said hello to June.
June = three birthdays.

My father-in-law and Hubs’ birthdays are literally the day after each other’s, so as you can imagine, it was a busy weekend for me. Unfortunately, by the time I had baked (that term is used loosely for this cake) the cake for my father-in-law, it was pretty much time to go and visit him. My problem: it had sunk after I had taken it out of the oven!
This NEVER happens to me! Distraught, I walked myself to the local supermarket to by a fresh Victoria cream cake. That’s the ONLY time I have given someone a cake for their birthday that I haven’t made. He was very appreciative of it, none the less.

Next day: The Hubs’ birthday.

He’s not too fond of fondant icing (fond used too much there!) or buttercream, so I opted to make him an Amaretto cake. Naturally, I used this excuse to buy a new bottle of Disaronno… The recipe I used called for almond essence, ground almonds and a few tablespoons of amaretto. I used a deep tin (the one I usually use for Christmas cakes) to bake the mixture in. I baked the cake in the oven for three hours, on a low heat and the smell that enveloped my kitchen and living room was a dream. As I had baked this fairly late at night, the smell lingered and was something nice for The Hubs to wake up to on his birthday. Although evenly baked and a lovely golden colour on top, the cake looked a little too plain, so, I made him a cake topper.
He is a fan of motorbikes and that’s just what I made for him.
I present to you a Kawasaki VN900 Custom:

Cake Topper: Kawasaki vn900 Custom

Cake Topper: Kawasaki vn900 Custom

I coloured and used fondant, and as you can see, the bike is very much 2D rather than 3D.

I might just have to stock up on gum paste for future projects like this…

Stay tuned for Baking Projects: April – July Part #2

Mad March Part #2 – Birthdays

Tardis!Aside from Mother’s Day and Comic relief, March is also the time of year when two family members celebrate a birthday, on the SAME DAY!

This year, I only had a week between Mother’s Day and my mum’s birthday and that meant that she was lucky enough to enjoy cake twice in one week! After baking her some cupcakes I decided to bake an actual cake she could cut into pieces and share, if she wanted to.

I have seen many ombre style cakes floating around on Pinterest and Face Book and thought I would have a go at this for my mum’s birthday cake.
As I haven’t got a turntable (that will all change come next pay day!) I decided not to pipe buttercream roses around the outside of the cake, but instead opted to decorate it with fondant icing. The ombre effect for the cake was hidden underneath the fondant, a surprise for when she cut into it! Mwhahaha!

To bake the cake, I used a basic vanilla sponge recipe and set out to weigh enough ingredients for three individual cakes or layers. I divided the cake mixture evenly between three bowls and set to colouring each mix with a different shade of pink gel food colouring. The gradual increase of shades of pink in the cake would give the desired ombre effect. Once an even colour was achieved, I poured the cake mixture into three individual tins, before placing them in the oven to bake. Of course, because this was a birthday cake, I naturally sung happy birthday to them whilst they were baking away in the oven.

NB: I always sing/talk to my cakes in some shape or form whilst they’re in the oven. No, I’m not crazy, just quirky. Plus, a scientific study I read a couple of years ago showed results that if plants are spoken to as they are growing, then they grow and thrive really well. It is at this point I will introduce my Easter cactus Sheila, and my orchid, Ophelia. NOT crazy but quirky! I figured if this works for plants then surely it would work for cakes, too!

Anyway, after the cakes had baked and cooled, I assembled them into their layers. I decided to ‘sandwich’ them together with raspberry jam and coat the cake in butter cream, to give an even surface for the fondant. After the assembly was complete, I covered the cake in fondant and then decorated it with flowers I had cut out using my super cool plunger cutters. As soon as I had finished decorating, I took the cake around to the birthday girl! I think she liked it :p

Mum's Birthday Cake

A piece of cake!

As I mentioned earlier, there was another birthday being celebrated on the same day as my mother’s and that was the birthday of my niece.
Last year, I made her an entire Tardis, complete with the Doctor and Amy. I knew nothing was going to top that, so I thought double chocolate cupcakes might come close. I mean, who doesn’t like a good ol’ chocolate cake? Crazy people, that’s who!
The recipe I used for the chocolate cupcakes is one which I found on the internet some time ago, but I can’t remember exactly where I got it from! When I find the link, I’ll post it on here. It’s dead easy to follow and always produces excellent, moist cakes every time. Deffo a winner! So too was the chocolate buttercream I used. Again, another recipe copied down from the internet, but I can’t remember where it came from.

And now time for a sad little confession: I was mega excited to be using my shiny, new icing nozzle for this project. I’ve always wanted to create an ‘ice cream swirl’ effect on top of my cakes and have always had to make do with something that looked a little like what I wanted. But now I have that very tool in my arsenal and I was very impressed with the outcome! Mwhahaha!

After I piped the chocolate buttercream on top of the cakes (it smelled A-M-A-Z-I-N-G!) I sprinkled white chocolate stars over them. This had to be done quickly as the stars started to melt (which, in itself could sound like the title to a Doctor Who episode!). I then took out my supply of ready coloured fondant icing and started to get creative. I made mini Tardi (plural?!), bow ties and a fez and then placed them on top of the cakes, added them to the box and gave them to the birthday girl. I can confirm that she really enjoyed them and what’s more, she really wanted a birthday cake with a fez. Result!

Birthdays are cool!

Monster

Many apologies for keeping you hanging on for the tutorials I mentioned in my last post, way back in July!

I have dusted the cobwebs from the page and found, lurking in my drafts folder, the post I promised many month ago. So, here it is.

Happy baking 🙂

The whole point of this blog is to document my baking projects. They are mainly projects of cakes for birthdays, with a few festive bakes thrown in for good measure.

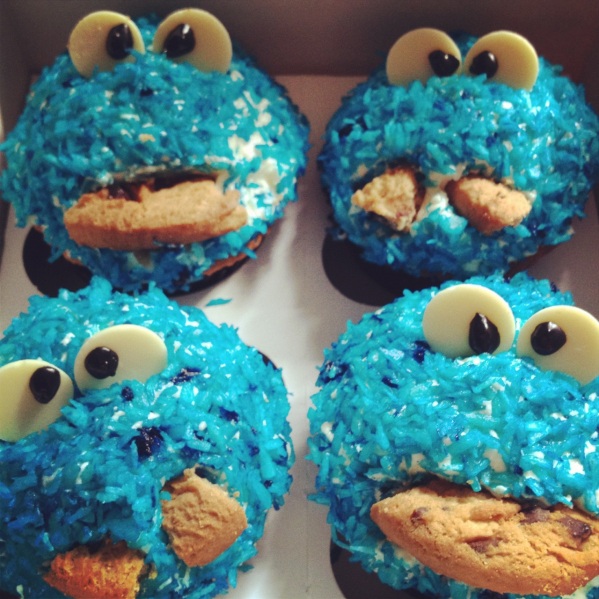
A good friend of mine celebrated a birthday in July, and stumped on what to bake for her, I opted for Cookie Monster cupcakes. They were good fun to make and I will definitely be making them again. See below for a step by step guide to create your own Cookie Monster cupcakes.

Cooooookie!


Cookie Monster Cupcakes

Ingredients

For the cakes (makes approx. 6-8 cakes)

2 free range eggs, beaten

4 oz self-raising flour

4 oz butter

4 oz caster sugar

1 tbsp milk

1 tsp vanilla essence

1 tsp baking powder

For the decoration

Food colouring (I use gel food colouring for best results)

Icing sugar

Butter

Desiccated coconut

Chocolate chip cookies, broken into chunks

White chocolate buttons

Method

1. Pre-heat your oven to gas mark 4. Line a muffin tin with cake cases of your choice. For this project, I used plain black cake cases.

2. Using an electric mixer, cream together the butter and sugar until light and fluffy in colour. NB: If you don’t have an electric mixer, creaming with a wooden spoon will fine, it’ll just take a little longer.

3. Pour a little of the beaten eggs into the bowl and a tablespoon or so of the flour. Mix together until well blended. Repeat this process until all the egg and flour are combined with the mixture.

4. Mix through the milk, vanilla essence and baking powder.

5. Divide the cake mix evenly between the cake cases.

6. Place the tin in the centre of the oven and bake for 12-17 minutes, or until the cakes are well risen, golden brown, and springy but firm to touch.

7. Remove from the oven and allow to cool slightly, before taking out of the tin and placing on a wire rack to cool completely.

Decorating

For the cakes, you can use as much or as little butter icing as you like. I mixed too much, as I always do, for good measure. It’s better to have too much than too little!

1. In a bowl, mix up some butter icing using the butter and icing sugar. Work towards a good, firm consistency. Afterall, you don’t want your Cookie Monsters to melt! Cover the top of each cupcake with the butter icing. It doesn’t have to be too neat.

2. In a separate bowl, mix together the desiccated coconut and a few drops of blue food colouring. If only a few flakes of coconut are dyed, try adding a drop of water to the bowl to loosen the gel food colouring. Don’t make the mixture too wet, though!

3. Take each cupcake in turn and dip into the dyed coconut.

4. Once coated in blue ‘fur’, carefully cut a slit in the cake for a mouth. Take a few chunks of the chocolate chip cookies, and place in the mouth you have created. Our monster is starting to take shape.

5. Take two white chocolate buttons and place on top of the cake; these are our monster’s eyes.

6. Finally, with black writing icing, dot eyes in the middle of the white buttons.

And there you have it. The Cookie Monster has come to life in cake!


Cooooookie!


Want to try something else?

Don’t feel restricted to making just Cookie Monster cupcakes. Why not use a different food colouring to create all kinds of colourful, fuzzy, edible monsters?!


July

Mundane grown up stuff has prevented me from posting on here recently, but I have finally found time to sit down with a cup of coffee and update the blog.

Posts coming soon to the blog will be:

  • How to create a handbag cake
  • How to make Cookie Monster cupcakes

Until then, happy baking 🙂


You know you bake too much when…

… You dream of baking a periodic table in the form of fondant fancies.

I fear that my love of The Big Bang Theory and the fact I proved to the Hubs that the chemical symbol for Silver is Ag, may have prompted that dream.

Too bad I don’t know of anyone whose birthday it is soon who likes chemistry.

Maybe one day, when I get bored, I will turn that dream into a reality.

Pick a card, remember it and don’t show me…

INSPIRATION for my recent baking project was taken from my brother. Well, it only made sense seeing as though the cake was for his eighteenth birthday.

Remember the Wii cake from an earlier post? That was for my brother, when he was crazy about all things Nintendo. And the Fez? Yep, that was his birthday cake, too, for his last birthday.

So, this year he turned eighteen and his latest obsession?

Cards and tricks.

He probably won’t appreciate Paul Daniels as much as I do (he probably doesn’t even know who Paul Daniels is because let’s face it, I’m old!) but I have to say, his card tricks are pretty damn cool.

Don’t show me

The cake was made and decorated at my place, so it was left as a surprise until his birthday. But I wasn’t decorating it alone; I had the help of my sister.

She came around the night before he turned eighteen, we put on some John Barroman tunes and got to it, like the little cake elves that we are.

It was really easy to decorate and lots of fun.

How it’s done

I baked a basic vanilla sponge in round tins before my sister came over, and sandwiched them together with raspberry jam and vanilla butter cream. I also made up some red and black fondant, using white icing and gel food colouring.

Between us, we kneaded 1kg of white fondant icing and then rolled it out to about 1cm thick. We carefully covered the cake with the icing, smoothed and trimmed off the excess.

Then came the fun bit: decorating.

To start with, we piped alternate black and red pearls along the bottom of the cake and then around the top.

Then we chose a colour of fondant each: I choose black, my sister red. We then cut out the shapes of card suits, with the help of templates that we had printed off. Once we had enough shapes, we placed them around the sides of the cake, using water to stick the icing shapes in place. And we were done.

BUT

The cake looked a little bare on top and we didn’t want to just pipe happy birthday on top. So, we decided to make some playing cards.

Originally, my brother did ask for this design for his cake

And I was like, huh?!

Then I had an idea.

He likes The Big Bang Theory and he likes playing cards.

The Big Bang Theory + liking cards = a custom deck of playing cards, in icing, of course.

I cut out some rectangles of of plain white icing, and painted them with a ‘Bazinga!’ logo I had found on the Internet.

Et voilà. The custom deck of cards is complete. I let the cards dry and then placed them on the cake with a little bit of butter cream the following day.

Happy 18th Birthday!

It was a simple cake design, but I think my brother liked it.

Bazinga!